BitNinja Daily Routine - How to eliminate hackers on your servers completely?
We have collected the best practices of the most successful BitNinja customers. Would you like to completely eliminate hackers on your servers? Follow this guideline to achieve the most with BitNinja and stop all hackers.
The initial steps to eliminate hackers
When you first install BitNinja on your server, the best you can do is to enable all modules. All the beta modules are used in many production servers, it is safe in most of the cases to simply enable them all. If you have considerations about enabling all the modules, then here is a list of minimal modules to enable:
IP reputation
DoS detection
Web Honeypot
WAF 2.0
Malware Detection
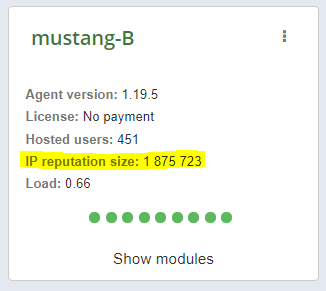
A couple thoughts about these modules: IP reputation is the base building block of your defence line. This is why you can’t even manually disable this module. Make sure all your servers have the whole IP reputation list. It is fairly easy to check it. On the admin panel, you can check the size of the IP reputation list. It should be about the same on all of your servers. It is not necessary to have exactly the same size, but if the number is too small, or it is 0 then something is not working with the IP reputation.
DoS detection is also a basic module, though it is not always essential it is good to have it switched on to stop Slowloris-like dos attacks. Web Honeypot is important to be enabled as it is very useful to trap hackers. Later on, I’ll show how you can convert backdoors to file level honeypots with the bitninjacli command. WAF 2.0 is the heavy gun when it comes to fighting hackers. It is vital to configure and enable this module. Later in the guide, you can find detailed instructions on how you can customize the settings. Malware Detection it the ultimate alarm that can tell you if a web account has been compromised on your server. It is also essential to enable it because the report generated by this module will be the starting point of your daily security checkup. Outbound WAF is only necessary if your server is heavily infected, and you first need to stop and mitigate the outbound trash. This module can also help you to identify unknown malware on your server. After you installed BitNinja and enabled the modules you like, the next important thing is to do a full malware scan. You can do a full malware scan with the bitninjacli command line tool:
In some systems, the home directory of the web users is on a different place for example in /var/www. The malware detection module should be enabled before you run this command. BitNinja will do the scan in the background, and you can find a list of cleaned/quarantined files on the dashboard under the Infected Files menu. If you enable, you can get daily and/or weekly report about the infected files. You can configure it under Settings/General settings. When BitNinja finished the full scan review the quarantined files to see which accounts are the most infected.
The daily checkup process
To maintain a high protection level, check the Infected files report every day. If BitNinja identifies a newly infected file, it is very important to investigate the root cause of the infection and close the hole. How can you do this? See the next section.
What to do if malware detection finds malware on my server?
When the malware detection module finds a malware it is a clear and true sign, your defence lines were simply not strong enough, and a hacker has at least one way to write files to your server. It is very dangerous to not handle such cases. The malware detection module will quarantine the infected files by default, but won’t automatically patch the root cause, so currently, you have to do this step manually. First, identify the source of the file infection. On shared web hosting servers and web servers, in general, the source of the infection is
by FTP upload
by exploiting web vulnerability
through ssh (pretty rare)
How can you find the root cause of an FTP infection? Infected file found by BitNinja: /home/user1/web/wp-content/plugins/stats/uploader.php To find the root cause of an FTP infection, you should refer to the FTP xfer logs. It is important to note you need the xfer logs, not the daemon logs of the FTP server. Only the xfer logs contain all file operations by the FTP server.
FTP server
Log path
Proftp
/var/log/proftpd/xferlog
VSFtp
/var/log/xferlog
To find the relevant log lines you can run this command:
The output will reveal the FTP user who uploaded the infection. You can simply change the password of the FTP account. Probably the password used was too weak or a computer was compromised where the password was saved. If the output is empty, chances are good, the file was not uploaded via FTP. How can you find the root cause of an HTTP infection? Http infections are very popular. There are tons of vulnerable CMS systems and plugins. There are a lot of botnets which trying to exploit these vulnerabilities. The BitNinja greylist will stop a good 80% of them and the WAF 2.0 can stop the rest in most of the cases, but sometimes - mostly in case of targeted attacks or with previously planted backdoors - the attackers can still find a way to upload a malware. How can you find and secure the weak point in this case? You have to find the relevant logs in the web access log. In most cases, there are a lot of access logs, so it is pretty hard to find which log lines are relevant, but there are a couple tricks to filter even giant access logs and find the relevant lines easily
Find the relevant domain
Filter for the relevant timeframe
Search for POST requests
1. Filter the relevant domain To find the relevant logs, first, you have to find out which domain was involved by the attack. To find the relevant domains you can search for it in your apache configuration file or use your control panel (cPanel, Plesk, etc.) to find which domains are pointing to the given directory. 2. Filter for the relevant timeframe The malware detection module will save the timestamp when the infected file was found.You can use this information to filter your logs. This is an example command to filter log generated at 9:41
# cat access.log | grep 25/Mar/2018:21:15
It may give you false lines if the log contains this string anywhere else, but in general, it is extremely rare. 3. Search for POST requests Attackers will upload the infections with POST HTTP method in most of the cases. The reason behind it is the followings:
GET parameters are logged so it is easy to filter them when POST data is not logged by HTTP servers
GET has a size limit on all web servers apache2 has a limit of 128K by default
Remote file inclusion vulnerabilities work with POST in most cases
This is a default method for file uploading
PHP file upload methods expect the file from POST data
So you can filter the logs further if you look for POST requests only.
Example
This is an example command to find the root cause of an uploaded malware:
2. Increase the strictness of the WAF With the WAF 2.0 BitNinja module, you can set up a separate WAF ruleset for every domain pattern (a domain pattern is a domain and a path, for example, *example.com/wp-admin/* is a domain pattern) If the safe minimum ruleset was not enough to catch the bad guys, feel free to set up a more strict ruleset template. The medium or strict ruleset template will increase the chance of stopping the attacker. In some cases, it is a good idea to go deeper and analyze the attack to find out which rules can block the infection. 3. Greylist all IP-s involved The log analysis form the previous section will tell you how the attack was carried on. You have the IP of the attacker. Go ahead and greylist or blacklist it.
# bitninjacli --greylist --add=1.2.3.4
If you greylist the IP keep an eye on the logs about the IP to see if the attacker comes back to resolving the CAPTCHA. If they do, you can blacklist the IP. Greylisting is enough in most of the cases. Greylisting has the advantage of logging any further requests so you can analyze them to find out more about the attackers. If you have found an uploader or a backdoor then you can list all the log lines related to the backdoor and greylist all IP-s which called the backdoor. We have prepared a script to help you parse apache2 log files and greylist Ips. Here’s how you can use it:
This command will list all unique IP-s from the log and greylist them.
Now, it's your turn
If any concern have arisen during these steps, please don’t hesitate to contact the ninjas at info@bitninja.io. We are always happy to answer your questions. Also, we’d highly appreciate if you would share with us, how you use BitNinja. How frequently do you login to Dashboard? Which modules are enabled? What menus do you visit regularly?
Proactive server protection from a centralized, easy-to-use console. Secure your web servers and customers’ websites against all kinds of cyber threats with our multi-layered security tool
This website uses cookies so that we can provide you with the best user experience possible. Cookie information is stored in your browser and performs functions such as recognising you when you return to our website and helping our team to understand which sections of the website you find most interesting and useful.
Strictly Necessary Cookies
Strictly Necessary Cookie should be enabled at all times so that we can save your preferences for cookie settings.
If you disable this cookie, we will not be able to save your preferences. This means that every time you visit this website you will need to enable or disable cookies again.