[et_pb_section fb_built="1" _builder_version="3.0.47"][et_pb_row _builder_version="3.0.48" background_size="initial" background_position="top_left" background_repeat="repeat"][et_pb_column type="4_4" _builder_version="3.0.47"][et_pb_text _builder_version="3.21.1" background_size="initial" background_position="top_left" background_repeat="repeat"]Complicated WAF setup? Not anymore!
The new BitNinja Transparent Proxy offers a new way for a much easier WAF setup and more convenient WAF management.
You don’t have to hassle with enabling the X-Forwarded-For header
from now on.
Background
At the beginning of 2019, we released a brand-new Web Application Firewall. We completely redesigned our previous WAF solution and we’ve already published several articles about WAF 2.0:
BitNinja WAF 2.0 is based on an nginx reverse proxy, so in order to see the real visitors’ IP in the server’s access log files, we always advised our ninja friends to make specific config modifications (e.g. changelog format, set up X-Forwarded-For header, etc.).
However, these settings could be difficult sometimes, so we want to save time and energy for our customers. That’s why we implemented a new solution, the BitNinja Transparent Proxy.
This way, our users have to do less manual intervention to make the WAF work properly (soon, they won’t have to make any manual changes because the Transparent Proxy will be enabled by default).
The Transparent Proxy helps to make our WAF 2.0 more user-friendly in another way too. As there is no need for the X-Forwarded-For header anymore, we can avoid those issues when the security checker conflicts with this header because of the different rate limits. So, our WAF became compatible with every service.
In order to make it happen, we had to implement special routing settings, new config services, new headers, etc.
How does BitNinja Transparent Proxy work?
The Transparent Proxy sits between the user and the content provider. It intercepts and modifies the request and if it matches with an enabled WAF rule, the request will be blocked. Otherwise, if the request is not malicious, it will be forwarded to the destination while staying invisible not only for the clients but also for the server.
That’s how our Transparent Proxy processes the requests:

- A packet comes via HTTP(S)
- The haproxy (SSL Terminating module) adds the necessary headers
- WAF (nginx) processes the packet
- According to the headers, the packet will be reduced to the same format as the original one
The Full Transparent Proxy will send the packets via socket connections and not via TCP.
Connection with other modules
The new firewall redirections are processed by the BitNinja SSL Terminating module, so running the SSL Terminating module (=Protection on HTTPS) is required for the Transparent Proxy.
As mentioned above, the BitNinja WAF 2.0 will examine the requests processed by the Transparent Proxy. According to the enabled WAF rules, if the request is malicious, the IP will be blocked. If the request is not harmful, the nginx will remove the headers added by the Transparent Proxy and it’ll be forwarded to the destination server.
Trusted Proxy is another new module that helps to trace the hackers’ IPs behind proxies. If you’d like to learn more about the BitNinja Trusted proxy, check out this article
.
As mentioned in that post, the Trusted Proxy has the same pre-requirements as the WAF 2.0. Currently, the Trusted Proxy will work only by setting up the X-Forwarded-For header, but later on, we’d like to use the Transparent Proxy for the Trusted Proxy too.
When it’s achieved, we can call it a FULL Transparent Proxy. 😉 (Note: If the user doesn’t use Cloudflare, this module can work as a Full Transparent Proxy already.)
Set up the Transparent Proxy
In the near future, the Transparent Proxy will be enabled by default, but until then, you can turn it on with a few very easy steps:
BitNinja agent version should be at least 2.0.0. Older agent versions don’t have the necessary redirections.

Open the WAF Manager config: /etc/bitninja/WAFManager/config.ini
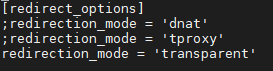
Go to the [redirect_options] where you’ll see this:

Please remove the ; in the last row. So, this section should look like this:
As you can see, the server has to be able to process tproxy iptables. It is available from CentOS 6+.
- Regenerate the SSL Terminating module
bitninjacli --module=SslTerminating --regenerate
- Reload the SSL Terminating module
bitninjacli --module=SslTerminating --reload
bitninjacli --module=WAFManager --restart
That’s all! 🙂 It’s much easier than the hassle experienced with X-Forwarded-For headers, isn’t it? And after we make the Transparent Proxy enabled by default, you won’t even have to do these steps. Instead, the WAF will run without any configuration. 😉
Need help?
WAF pre-config became a child game with the Transparent Proxy, but of course, we will gladly help you if you have any kind of questions about this new feature or any other BitNinja-related thing. You can reach us at info@bitninja.io or on our Dashboard chat.
[/et_pb_text][/et_pb_column][/et_pb_row][/et_pb_section]


